One of the hard parts of this whole low oxygen brewing thing is fermentation, because you have to be really careful about these tasty polyphenols you saved from giving their life to protect your beer on the hot side of the brewhouse. We need to make sure they don’t fall on their swords during fermentation for us either! We utilize what is considered to be the traditional cold lager fermentation and for that type of fermentation profile you need to pitch a lot of healthy yeast, 2.5 x 10⁶ cells/ml/°P to be exact, which is considerably higher than normal. However don’t fret! We have you covered and it isn’t all that horrible.
Here is the process I use, bear with me… You are going to think I am crazy, and rightfully so… I am.
The easy method (not the cheap method 🙂 )
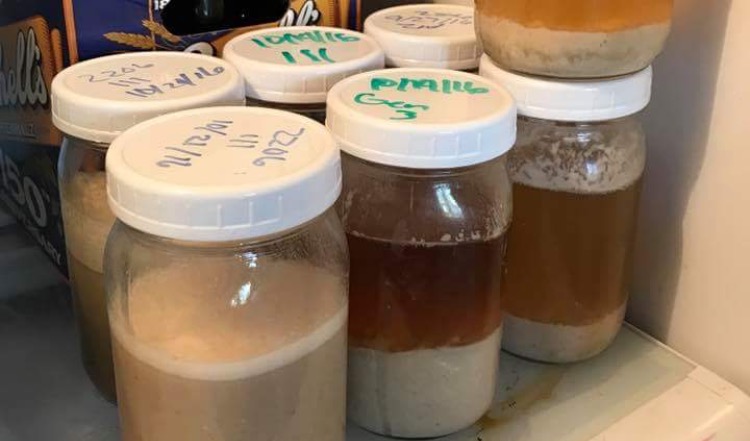
- Round up 1 dozen 1 qt. mason jars
- Go find 5 smack packs or vials of the FRESHEST German lager yeast you can for a 5 gal. batch (Or 1 vial/gal). At this time there is NOT a dry lager strain we recommend, sorry.
- Pitch those 5 packs into 5 gallons of beer, and ferment your beer between 45-48 °F.
- With a few gravity points remaining, you are going to sanitize 2- 1qt. jars and get ready for the transfer into the packaging vessel.
- Rack beer over to packaging vessel, reserve 2 qts. worth of beer/yeast from the bottom of the fermenter. Stir that up and put into the 2 jars you have sanitized.
- Label them with date, yeast, generation.
- Place lids on and set them in the fridge.
- Next brew session pour off beer in one jar and pitch that entire yeast cake into beer.
Its as simple as that!
Lets break it down a bit here though. Basically each ferment is going to net you 2 pitches, I have had success going to 6 generations, that is going to net you a potential 59 batches from those 5 packs of yeast! (EDIT: Update, I have been going on these pitches since, I am at over 200 batches)You were freaking out at first weren’t you? I utilize a trub separation process which we feel really helps. This nets me trub free wort going into the fermenter, which means I get darn near pure yeast out. There are numerous benefits from doing it this way. Firstly, you are having healthy yeast and putting them into storage with food. They will slowly chomp on the residual extract left in the wort, and hopefully acclimate to colder temps. Secondly, that pitch rate works out perfect to 2.5 x 10⁶ cells/ml/°P (EDIT: Update, counts have been varified with a microscope to be very viable (less than 1% dead cells) and slightly larger than 2.5.) . This will minimize lag, and with minimizing lag, you are minimizing oxygen intrusion. Third you are allowing your yeast population to roughly double every time which ensures a healthy culture in subsequent pitches. You certainly don’t have to follow this, however you want to get the proper pitch rate of 2.5 x 10⁶ cells/ml/°P of wort you can, this just works for me.
I hope you found this to relieve a little fermentation stress with the cold fermentation schedule. We detail the fermentation schedule here: Cold Fermentation Practices