
Methods of the Modern Brewhouse
Version: 2.0
Last Updated: March 1st 2022
To improve is to change; to be perfect is to change often.
Success consists of going from failure to failure without loss of enthusiasm.
-Winston Churchill
Update for 2022:
We here at The Modern Brewhouse not only take these quotes, but our passion for making the best beer possible straight to heart. This paper was written in 2016, and nearly all of it still holds true today. However, while this is a testament of the robustness of the science and engineering that was put forth, we also have a continual never ending fight against the dogma that is spread throughout the community. If we did not update this, we would fall into the same fallacies as the others. That is just not acceptable to us.
When updating your brewing process, implement packaging and cold side recommendations first in order to achieve the most substantial improvements. Because ultimately if your packaging is not flawless, NOTHING you do on the wort production side will matter. An impeccable cold side, is paramount for you before starting on the hot.
Because many of the processes outlined below may be very different from your current way of doing things, a few attempts may be necessary before you are able to fully adapt these processes to your system. Where applicable, sensory indicators and in-process measurements relevant to successful implementation are noted for the steps below.
The steps and recommendations outlined below represent our current understanding of state of the art modern brewing techniques described in professional brewing textbooks and publications adapted to non macro breweries (small to medium craft and homebrew scale systems specifically). The goal of this overview is to provide enough information for someone to successfully implement the processes necessary to produce a commercial quality beer at home using modern brewing processes. What follows is a straightforward synopsis of the key process points, methods and equipment one can use to produce fantastic beer in your home. This means all beer! Your ales and lagers will benefit equally from these methods.
We hope you not only enjoy the content, but utilize it as it is meant to be: in the brewhouse!
| Prerequisites |
We assume that the following list of prerequisites contains steps that you currently follow or plan on following in the future. Don’t view this list as a set of limiting factors but rather as an assessment of your current capability and a wish/goal list for future purchases! As you will see further on in this document, we will try and outline key points of departure from certain methods and offer alternatives wherever possible so as to give all brewers the advantage of a “step-wise” implementation of the process.
Can you in the future, or do you currently, implement the following:
- Step mashing?
- Infusion step mashing with consistent temperatures?
- Have a method for rapidly chilling water and wort?
- Yeast starters? Storage and repitching of yeast slurry?
- Can you approximate yeast counts?
- Assure yeast health?
- Do you have a method for adding adequate dissolved oxygen before pitching yeast (O2 stone with 0.5 micron or 2 micron stone with known time and flow rate or known PPM DO)?
- Control/monitor fermentation temperature?
- Monitor fermentation progress (flavor, gravity, etc.)?
- Bulk store and monitor finished/packaged beer?
- Estimate and control pH?
- Do you have an accurate scale for measuring brewing salts?
- Can you condition your grain?
If you answered yes to, or plan on answering yes to, the above questions then you are ready for brewing!
| Notes on Dissolved Oxygen |
It’s important to note that controlling DO levels in your wort and finished beer is crucial for preserving flavors and aromas developed throughout the brewing process. The “lingering” fresh malt flavors present in beers produced using modern brewing techniques are the result of this attention to eliminating hot side and cold side oxidation. Controlling DO levels during the mash will preserve the fresh malt flavors inherent in the grains themselves by guarding them against oxidation. Whether these flavors persist after the mash and into the finished beer will be determined by how well you control DO after the mashing process. This is why controlling the boil and controlling the DO levels during the cold side processes are also vitally important.
What follows is a summary of key values related to DO content and mitigation:
- Tap/RO water can be saturated to ~8-12 ppm
- O2 solubility is ~4-5 ppm at mash temperature
- Pre-boiling/yeast scavenging can reduce DO levels to ≤ ~0.5 ppm
- Pre-boiling alone does not provide active protection against DO
- Metabisulfite (NaMeta or KMeta, SMB or PMB) or use of a pre-packaged (antioxin SBT). These serve as sacrificial antioxidants in the mash to protect malt antioxidants and polyphenols (assuming strike water is already free of DO)
- Reactive metals present in your equipment and ingredients including Iron, Copper, Brass and Aluminum introduce potential for oxidation reactions
- Brewtan B may serve to mitigate these reactions (collective experience is showing this to be accurate)
- Dough-in can add ~1-3 ppm DO
- Atmospheric diffusion rate of O2 is ~1-2 ppm/hr
- < 1 ppm DO during hot side is desired
- < 0.5 ppm DO during hot side is ideal (provides margin)
- < 0.15 ppm DO during packaging is desired for maximum flavor stability
Cold Side Processes: |
| Lagering and Packaging |
Packaging is one of the most challenging steps in the brewing process for preventing dissolved oxygen from being introduced into your beer. The duration for which the malt flavors will persist (“linger”) in the packaging vessels is ultimately dependent on the cold side O2 management you practice. Using your lagering vessel as a serving vessel after transferring to spund during active fermentation has shown to be the most consistent method for preserving freshness on a homebrew scale. Although spunding and using natural carbonation captured from the fermentation of remaining extract is the preferred way of finishing the beer, other methods for packaging and serving beer exist and are viable alternatives. Finished beer should never be transferred, only transfer wort with active fermentation occurring.
Goals
- Limit DO and TPO to the maximum extent possible (< 0.15 PPM desired)
- Support maturation and clarification
Processes for Natural Carbonation
Packing Considerations -> Purge Receiving Vessel -> Transfer from fermentor to purged vessel to finish carbonation
Packaging/Carbonation:
Spunding – Utilizing the last residual sugars during fermentation to carbonate the resulting beer.
Packaging can be carried out using a number of methods and packaging vessels:
- Dispense from Spunding/Lagering vessel or;
- Ferment to final gravity in fermentation vessel, dose speise/sugar priming solution in fermentor, wait for fermentation to resume then transfer to serving vessel (can alternatively dose priming solution in serving vessel)
- “Bottle Spunding”, i.e. bottling right off of fermentor or;
- Ferment to final gravity and use speise/sugar priming dosed inline at bottling or;
- Use a counter pressure bottle filler and package off the serving keg
Canning is the largest investment one could make in packaging technology. It is not without some hesitation that people brewing at home would even consider. Fortunately, if you do decide to shell out the capital for a unit like the Oktober MK16 (as shown in our video), we have you covered as far as a sound method for packaging your beer in cans is concerned.
- One of the key things to keep in mind when packaging is that while many useful anti-oxidant substances can be used when packaging, nothing supplants active yeast and its ability to naturally scavenge O2.
Purging:
- The receiving/serving vessel (keg, bottle, can, etc) must be purged of oxygen. This can be accomplished with the below:
- Clean the receiving vessel and fill to the brim (may require a shortening of the gas dip tube) with a low foam sanitizer such as saniclean or iodophor (Atmospheric O2 trapped within bubbles can introduce significant DO)
- Push the entire volume of sanitizer out of the keg with CO2
Transfer:
Here are some examples showing how to perform a closed transfer:
For Keg to Keg transfer:
- Jumper liquid out posts
- Jumper gas in posts
For Traditional Fermentor to Keg:
Here is a simple method for transferring to a spunding vessel:
- Jumper fermentor output to Keg liquid out
- Jumper blowoff to Keg gas in post
- Close receiving vessel and attach spunding assembly
- Set spunding assembly to desired pressure setting (start with 0.8 bar)
- Allow the beer to finish fermentation in this vessel, checking gravity at various intervals in between.
Lagering takes place in the spunding vessel after transfer. Depending on the cold/hot break exclusion routine you use, lagering times can be significantly reduced and this phase shortened accordingly. It is important to sample the beer as it progresses through the lagering process. Carrying over enough yeast to provide natural carbonation through fermentation of the remaining extract is another important part of this stage.
| Primary Fermentation |
Goals
Without going into a tremendous amount of detail here, let’s discuss, at a high level, some of the key factors and process points to primary fermentation for lagers and ales:
- Hot break MUST be removed
- Do not aerate/oxygenate wort until you have reached pitching temperature and add yeast quickly after reaching your target DO level
- Active yeast is your friend and its presence after aeration/oxygenation ensures O2 scavenging
- Pitching rates for cold fermentation 2.5 x 10⁶cells/ml/°P
- Ensure yeast is well mixed
- O2 or sterile air added to ~ 8 ppm DO
- Diacetyl/maturation rest should be unnecessary given the cold fermentation and high pitching rate
- Pitching rates for ale fermentation 1.5 x 10⁶cells/ml/°P
Process
A simple fermentation schedule for lagers (ale fermentation should proceed as normal):
- Cool wort to 5-6 °C (pitching temperature)
- Aerate/oxygenate wort and add yeast
- Allow beer to rise to 8 °C (over 48 hours)
- Hold at 8-9 °C
- If spunding: target 1% remaining extract prior to transfer (or use Low O2 spreadsheet calculator available to TMB members)
- If keg/bottle conditioning: Ferment to final gravity and use sugar/speise
- Utilize a Fast Fermentation Test (FFT) to accurately predict gravity (pull sample of fermenting beer for FFT)
Indicators
- Limited lag time between yeast pitch and CO2 production
- Steady fermentation that doesn’t stall towards the end of fermentation
- Proper pH drop during fermentation
- Suitable flavor development
- Ester, phenol, sulfur, and alcohol production suitable to style
- Consistent performance in subsequent generations when re-pitching yeast
Hot Side Processes: |
| Recipe Formulation |
Modern brewing will present the brewer with a very new and exciting palate from which to work off of when creating new recipes or revisiting old ones. Malt flavors will be new and exciting and hop flavors and aromas will be enhanced.
Rather than present a fully formed recipe, here are some of the high level considerations for recipe formulation:
- Color reduction can be ≥ 25% (or ≤ 75% of color predicted by the Morey equation)
- More is definitely not more, it usually means a muddy beer
- Pilsner malt alone may lack depth
- Consider a blend of Pilsner/Pale malt starting at ~4-5 EBC
- Wort flavor can take on characteristics of certain food products: cereals, breads, honey, etc.
- Consider blending Munich malts starting at ~17-18 EBC for beers like Dunkel, Marzen, etc.
- CaraHell can be a useful addition to beer like Helles, Export, etc.
- Higher EBC Caramalts such as Caramunich can be used successfully in low % in many beers
- Roasted malts such as Carafa Special can be used to add color in small percentages
- Roasted malts may need to be scaled back in recipes that traditionally call for larger %
- Sinamar is a very useful tool in matching color of commercial clones or darkening without adding flavor.
- It may be necessary to revisit old recipes and reconsider their construction
- Consider conducting a mini-mash when entertaining new malts or attempting to taste flavors before use
With regards to bitterness, hop schedules and IBU calculations:
- Hop flavor will possess more “presence” and “brightness” for lack of a better word
- Hop aroma will be enhanced
- Consider high alpha bittering hops for boil additions or use hop extract
- Save noble hops for FWH and late boil aroma additions
- Soft boils can alter hop isomerization, you may need to lower utilization with reduced boil off %’s
- If at all possible, try and limit hop trub in the kettle, as it may impart vegetal characteristics
| Brewing Water |
Crafting your brewing water is an important consideration when using these brewing methods.
Goals
- Control mash pH
- Suitable mineral profile for beer style
- Enough calcium for yeast health and flocculation
- Eliminate Chlorine/Chloramine from brewing water
- Eliminate DO from brewing water and protect against oxidation
Process
Let’s take a look at some key points and observations:
- RO/Distilled water will yield best results
- Brewtan B may be useful if using tap water (limit oxidation reaction potential from copper/iron)
- Metabisulfite (NaMeta or KMeta, SMB or PMB). Use of a pre-packaged antioxidant brand(antioxin SBT) or DIY “Trifecta” blend. These serve as sacrificial antioxidants in the mash to protect malt antioxidants and polyphenols (assuming strike water is already free of DO)
- It takes 5 ppm of metabisulfite to scavenge 1 ppm O2
- 100 ppm NaMeta has potential for 101 ppm SO4
- 100 ppm KMeta has potential for 86ppm SO4
- 100 ppm NaMeta has potential for 24 ppm Na
- 100 ppm KMeta has potential for 35 ppm K
- Keep this in mind when planning profile
- For most styles, CaCl is sufficient to add Ca
- CaSO4 can be used when higher sulfate levels are required (think pale ales) although high sulfate levels can contribute to the introduction of sulfur during fermentation and in to the finished beer
- MgSO4can be used to slightly boost SO4 to balance Cl/SO4 ratio
- Targeting 40-50 ppm Ca is useful
- Watch Na levels when adding NaHCO3
- Potentially reduce dose as you “tighten” system
- Consider using SO4 test stripsto evaluate your system and its metabisulfite consumption
- Metabisulfite reduces pH by 0.1 per 100 ppm:
| Dose Rate | ΔpH |
| 100 ppm | 0.1 |
| 80 ppm | 0.08 |
| 75 ppm | 0.075 |
| 60 ppm | 0.06 |
| 50 ppm | 0.05 |
| 40 ppm | 0.04 |
| 25 ppm | 0.025 |
| (Note: This is accounted for in the Low O2 Brewing Spreadsheet.) |
Indicators
- Suitable mash pH and extract efficiency
- Suitable mineral profile for beer style (taste, mouthfeel, etc)
- Limited of DO during brewing process (can be verified with in-process industrial DO meter)
- Residual sulfites going into the fermentor (verified with sulfite test strips or test kit)
- Lack of chlorophenolic compounds in finished beer (aroma/flavor)
Deoxygenating Strike Water
Two distinct procedures can be used to prepare de-oxygenated water for dough-in at the homebrewing scale: pre-boil and yeast oxygen scavenging (YOS). Commercial breweries commonly remove O2 from brewing liquor using N2 or CO2 gas stripping columns.
First let’s outline the preparation and mashing process using pre-boil:
- Bring strike water to a vigorous boil for 5 minutes
- Chill the strike water as rapidly as possible, dose Metabisulfite/”Trifecta” at 200°F, and continue chilling to the desired strike temperature
- Use the following dosing instructions to treat the strike water with antioxidants:
| • Strike Water | • Sparge Water |
| • ≤ 20-30 ppm | • ≤ 5-10 ppm |
- Once at strike temperature add grain and brewing salts to mash tun and slowly transfer for dough in
Now let’s outline the preparation and mashing process using yeast scavenging:
- Prepare a solution of dextrose and a dry bread yeast at a rate of twice your batch volume in grams (i.e. 5 gallons * 2g = 10 grams each of dry bread yeast and dextrose)
- Heat strike water to ~100 F to allow yeast to quickly uptake oxygen
- Ideal timing for dough-in following this treatment of strike water is between 2-3 hours
- Heat the water to strike temperature then use the following dosing instructions to treat the strike water with antioxidants:
| • Strike Water | • Sparge Water |
| • ≤ 20-30 ppm | • ≤ 5-10 ppm |
- Mix the antioxidants into the water thoroughly and let rest for 5 minutes
- Add grain and brewing salts to mash tun and slowly transfer for dough in
| Grain Crushing |
Goals
Grain crushing is very important in the brewing process. In a perfect world you would get an ideal, intact husk and a fully crushed interior. However we can only do the best we can. The goal of malt crushing is to crush the grains and keep the husk intact.
- Intact Husks
- Correct distribution of coarse and fine particles
- Limit flour production
- Limit heating of the grain
- Allow for sufficient wort recirculation during mashing
- Limit time between crush and dough-in
Process
You want to limit the time between when the grain is milled and dough-in is conducted due to the activation of oxidative malt compounds and exposure to atmospheric oxygen. It takes as little as 15 minutes for crushed grain to start staling after contact with oxygen.
There are a few ways to accomplish this.
- Mills (2 roller and 3 roller versions)– You will always get a better crush with a 3 roller mill, as you can set different gaps to help you. You certainly don’t need a 3 roller mill though to get a good crush. Milling speed matters much more.
- Milling speed (the slower the better…)– The rate at which the grain goes though the mill is going to have a dramatic effect on the crush. You can dial in your mill speed much like taking your pulse: count your revolutions for 15 seconds and multiply that by 4 to get your RPM. Target and RPM value under 100.
You may want to explore grain conditioning as well to go along with your milling methods.
Here are some advantages that go along with grain conditioning:
- Allows for coarser crush
- Coarser crush improves lautering
- Coarser crush inhibits LOX
- Improves husk elasticity
- Produces undamaged husk
- Allows for tighter gap on mill
- Yield and attenuation increase
- Conversion efficiency increases
- Conversion duration decreases
- Preservation of husk can improve stability
- Crush as close to dough-in as possible
- Use 1-2% water by weight
If a brewer is unable to mill their own grains, i.e. you rely on the LHBS for this function, short of buying a mill, a potential procedure for use may be:
Purchase your grains un-milled and ask the shop if they will allow you to condition the grain before they mill it.
If they agree:
- Condition the grain with 1-2% water by weight
- Allow shop owner to mill grain (or do it yourself if the shop permits)
- Take this grain home (preferably on brewday) and use it as quickly as feasible
If they do not agree:
- Allow shop owner to mill grain (or do it yourself if the shop permits)
- Take this grain home (preferably on brewday) and use it as quickly as feasible
Indicators
- Grain particle distribution (visual or ideally with sieve test)
- Limited flour and limited uncrushed kernels
- Sufficient flow during mash and lauter (no stuck sparge or mash)
- High conversion efficiency
- Fresh malt flavor and aroma in wort and finished beer
| Mashing |
Mashing is one of the most important stages, if not the most important stage, of modern brewing. Here you preserve phenolic malt compounds that would otherwise be oxidized upon dough-in due to the high DO content. It’s important to stress this point: you are not creating a specific malt flavor here but preserving one that is inherent in the malt. Your job as brewer is to give the malt the conditions by which it can be mashed without being oxidized.
Goals
- Remove DO from strike water
- Prevent DO ingress during mash
- Inhibit Lipoxygenase(LOX)
- Maximize enzyme activity (suitable time, temperature, pH and mineral composition)
- Complete starch conversion
- Control sugar composition to set limit of attenuation
- Limit sheer stress on wort from pumping or stirring
- Limit overall mash time needed to produce suitable wort
- Clear wort going into the kettle (turbid wort contains lipids which lead to staling)
Dough In
- Underlet the treated strike water to the grains, if possible
- If adding water from above, or if lowering in a grain bag (single vessel), do it carefully so as to not aerate the water or splash
- Bottom filling via underletting is preferred
- Filling from above with a line below the grain bed should work also
- It is important to stir thoroughly but gently after dough in
Mash
- Employ a mashing schedule that suits your system. If using direct fire/boiling water infusion, consider the Hochkurz schedule shown below.
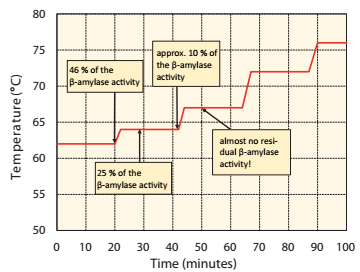
- Consider using multiple β rest temperatures if possible, or pick a β rest that suits your needs. If direct fire is not possible and boiling water infusions too problematic, utilize a single infusion mash at your chosen temperature. Note that the β rest temperature and time may change according to the malt being used, most specifically in reference to the gelatinization temperature of the malt.
- Continuous recirculation with direct fired MLT is beneficial
- Intermittent recirculation when infusion step mashing is beneficial (be mindful of temps)
- If using boiling water infusions without recirculation, stir gently
- Consider using a mash cap to reduce surface area of mash liquid exposed to the atmosphere (limits atmospheric O2 diffusion)
Lauter
- Maintain 1-2 inches of liquid above grain bed (underletting may be beneficial)
- Sparge with care if not underletting: add water gently and stir gently
- Use the following dosing instructions to treat the deoxygenated sparge water with antioxidants:
| Sparge Water |
| ≤ 5-10 ppm |
- Cloudy run off- Should be avoided at all costs- 5-40x more lipids are transferred in cloudy wort entering the boil kettle. which leads to accelerated staling.
- If using FWH add them while lautering to allow for enough steep time
- Consider a lauter cap to cover BK while lautering (limit atmospheric O2)
- No-Sparge is recommended as the most efficient way to ensure you do not pickup up significant extra DO
Indicators
- Little to no floating grain after dough in
- Little to no smell during mash (If you smell fresh malt during the mash those volatile aromas/flavors are being oxidized and ultimately lost)
- Wort clears after gelatinization/pasting temperature is reached and is clear going into the kettle
- Negative Iodine test
- No teig on top of grain bed after lauter
- Desired apparent attenuation achieved in finished beer
- Lighter color of wort going into the kettle
- Taste the wort. Well?
| Boiling |
Boiling the wort created in the MLT adds additional concerns to the process. It is important to control heat stress. This may come as a surprise to those who have read for years that vigorously boiling your wort is beneficial in many ways. Heat stress can serve to accelerate oxidation and affect the final flavor of the beer.
Goals
- Control heat stress by limiting boil time to 60-70 minutes
- Limit evaporation to 6-10% or less of boil volume
- DMS removal
- Hot break formation and precipitation
- Efficient hop utilization
Process
- Manage hot time before and after boil (rapid heating before and rapid cooling after)
- Consider partially opened BK lid (helps limit evaporation and reduces energy needed to maintain boil)
- Target a “simmer” rather than a robust boil
- Allow for sufficient wort turnover and correct pH (5.4 +/- 0.1) for DMS removal (Asymmetric heating can promote wort turnover)
- Add fining agents and adjust pH (5.1 +/- 0.1) at end of boil with sauergut or lactic/phosphoric acid for better clarification and fermentation performance
- Chill as rapidly as system allows to 5-6 °C
- Do not aerate/oxygenate until just before yeast is pitched
Indicators
- Clear wort going into the boil kettle
- Brilliant white foam and lack of teig in the boil indicates successful mash and lauter DO prevention
- “Egg drop soup” hot break formation
- Clear wort going into the fermentor with minimal cold break (No hot break or trub carryover)
- No DMS in finished beer
- Smooth hop bitterness and flavor in finished beer (lack of herbstoffe)
It should be noted here that minimizing trub from wort production and boiling serves as a valuable input to later stages. The clearer the beer that goes into the fermentor the better. Break material exclusion in these stages will help speed up lagering and enhance and reinforce flavor stability of the final product.
| Notes on Equipment/Process |
Below is a simple list of areas of improvement in equipment and process:
- Eliminate splashing or unnecessary aeration
- Stir gently
- Eliminate Copper, Brass and Aluminum (if, and where, possible)
- If using these metals, Copper chillers seem to be the most widely used piece, Brewtan B or equivalent substances are proving themselves very useful in mitigating possible Fenton Reactions during the hot side process
- Ensure tight hose connections
- Metabisulfite (NaMeta or KMeta, SMB or PMB)- Dosage will be entirely dependent on sensory analysis
- Use of a pre-packaged (antioxin SBT) or DIY “Trifecta” (Meta, AA and Gallotannins, at 45% 45% 10%) provides active protection from DO
- Underlet mash if possible to reduce dough-in DO
- Employ a mash cap
- Consider continuous recirculation (direct fire) or recirculation when infusing
- If recirculating, make sure return line is below liquid level to minimize aeration
- If recirculating, reduce flow at outlet (mechanically or electrically, preferably electrically) to ~3-4 l/min
- Consider using a lauter cap (to limit atmospheric diffusion of O2when lautering)
- Consider No-Sparge mashing (full volume)
- Chill wort as rapidly as system allows
- Aerate at pitching temperature just before pitching yeast
- Pitch enough healthy yeast
- Ensure proper keg purging
- Consider using biological acidification (Sauergut)
| Conclusions |
The goal of this paper is to allow the homebrewer, with varying levels of experience, to adapt to and incorporate the basic concepts of modern brewing into their personal brewhouse and experience the wonderful flavors of this style of brewing. We hope that this uncluttered approach is useful in untangling some of the information that exists on the subject.
This document has been constructed to be interactive with the content on The Modern Brewhouse. You’ll see many links peppered throughout the document that link to more detailed information on individual subjects discussed at a high level here. It is our hope that this overview provides the basics for the process and the links enhance the topics so that brewers can use the methods without being burdened with the “heavy lifting”.
These methods do not have to be hard and we are here to help you get on your way!
A special thanks to The Modern Brewhouse community, for the work in these revisions and tireless effort in using and honing these methods for all to use.
| References |